Quality Construction
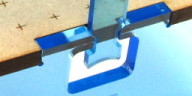
The fixture may be low-cost but the construction is high quality. All the major parts are laser-cut for precision, and all the markings are laser-engraved with similar accuracy. The brackets that support the probe plate are steel, and tab features ensure that the pieces go together correctly aligned. A full-width brass piano hinge supports the pressure plate. The self-aligning front clip holds the fixture securely closed.
Easy Alignment
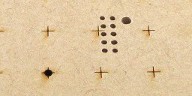
The probe plate and the pressure plate both feature an engraved grid and tooling holes for easy alignment when drilling to customise the fixture for your board. Using the drilling method described in the Assembly Guide, both plates can be drilled without any measuring. Both plates are made of materials that are easily drillable. Alternatively, order your fixture custom drilled.
Easy Assembly
After drilling, the fixture goes together using only a screwdriver. You don't need any specialised tools.
Simple Locating Method
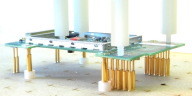
One of the difficulties with traditional PCB test jigs is the method of locating the board on the fixture. This often involves precision-ground tooling pins with complex mechanical ejectors, or custom-machined plates. In the Merifix system ordinary spring probes are used, with large conical heads, mounted slightly higher than the test probes, which locate in tooling or mounting holes in the board. The board sits on these locating probes which compress to lower the board on to the test probes as the fixture is closed. It's simple, cheap, accurate and reliable, with no danger of the board binding or sticking as the fixture is operated.

No Adjustment
We've done the work of figuring out the vertical dimensions so you don't have to. If you use the test probes and locating probes that we supply, and the hold-down posts that come with the kit, then when the fixture closes the movement of the board and the travel of the test probes will be just right without any adjustment.
Easy Connections
The rear panel features an insert for mounting the connectors that will be used to connect the fixture to external test equipment. The insert is easily removeable without disassembling the fixture, and it is made of thinner material than the rear panel so it is easy to drill or cut holes for your connectors. Laser-engraved markings help minimise measuring. A range of inserts is available with holes already cut to suit common connectors.
