Prepare Your File
To specify your requirements for a custom drilled test fixture kit you need to prepare a text file in CSV format (comma separated values) that lists your test points, locating holes and hold-down post locations, one per line. You can prepare this with a simple text editor, or with a spreadsheet program that allows saving in CSV format.
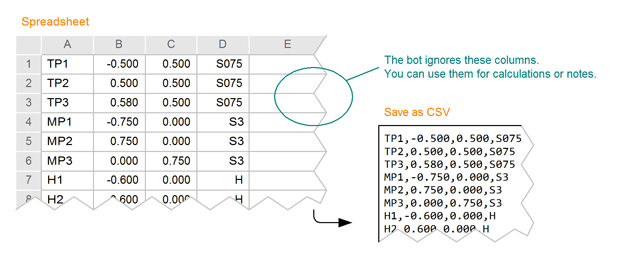
The file lists the locations one-per-line. Each line has four values, separated by commas.
The first value is just a reference (such as a reference designator, like TP3) for your convenience, to help you keep track of which location is which. The second and third values are the X and Y coordinates, in the units you have chosen (inches or millimeters). The coordinates are typically specified relative to the board origin. When you upload the file you will have the opportunity to specify a rotation and offset, to position the board in the desired location on the fixture. You will also be able to specify that the X-axis is to be flipped, to allow for testing the board face-down.
The final value on each line describes what type of item is located here. Common values include: S075 for a test probe; S3 for a regular size locating probe; S4 for a larger size locating probe; GP2 for the largest size locating probe; H for a hold-down post. There is no need to specify the hole size or whether the hole is to be drilled on the probe plate or pressure plate; this is figured out automatically.
There are a few other less common types of item you can use including other sizes of test probes, provision for mounting Tag-Connect Plug-of-Nails™ probes, general purpose mounting holes, and arbitrary slots and cutouts. See the complete list of all drillable items.
You can download an example file that you can use straight away to see how the system works. The example file uses inches for units and will work on an MF300 with zero offset and rotation.